rocketmq的存储原理
rocketmq的存储设计主要是分为三个文件:
- comitLog文件,该文件是用来顺序存放所有的消息
- consumeQueue文件,该文件是用来保存每一个消费队列的消费信息的
- IndexFile文件,该文件是用来加速消息的检索性能,根据消息的属性快速从comitLog获取信息的
消息如何实现存储的?
commitLog是消息存储的文件,是一个容量为1G的文件。该文件以文件中的第一个文件在broker中的偏移量作为文件名称。
在mq内部用MappedFileQueue来表示store/commitLog这个文件夹;用MappedFile来表示单个commitLong文件。
-
commitLog内部数据-有数据时
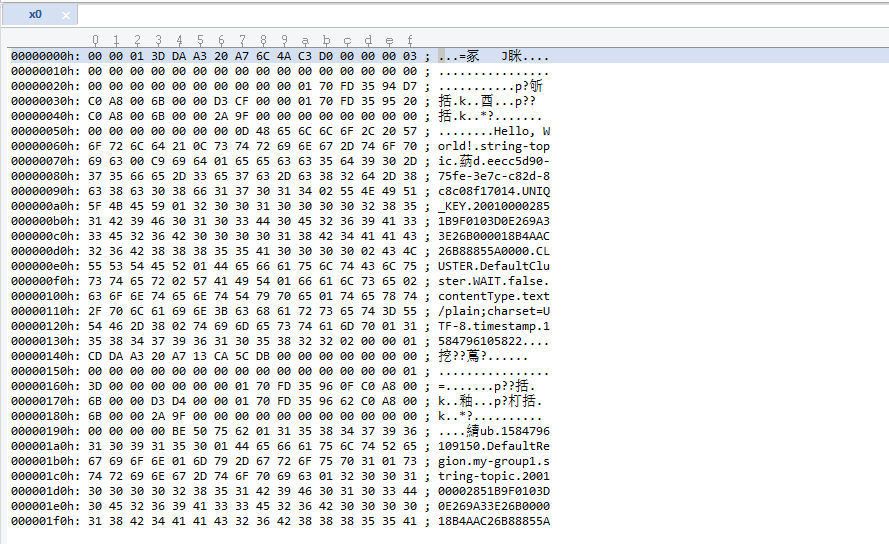
-
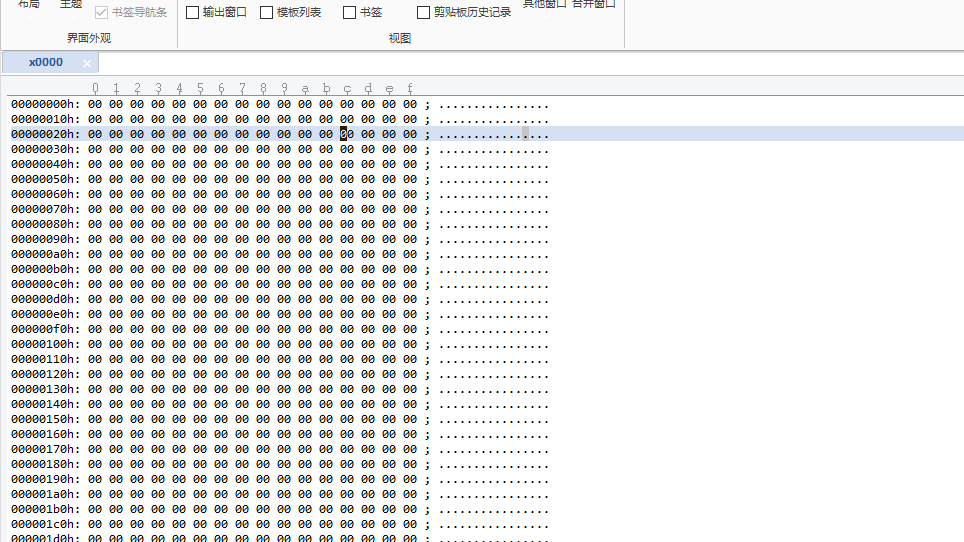
commitLog内部数据-无数据时为空字符
写入commitLog文件
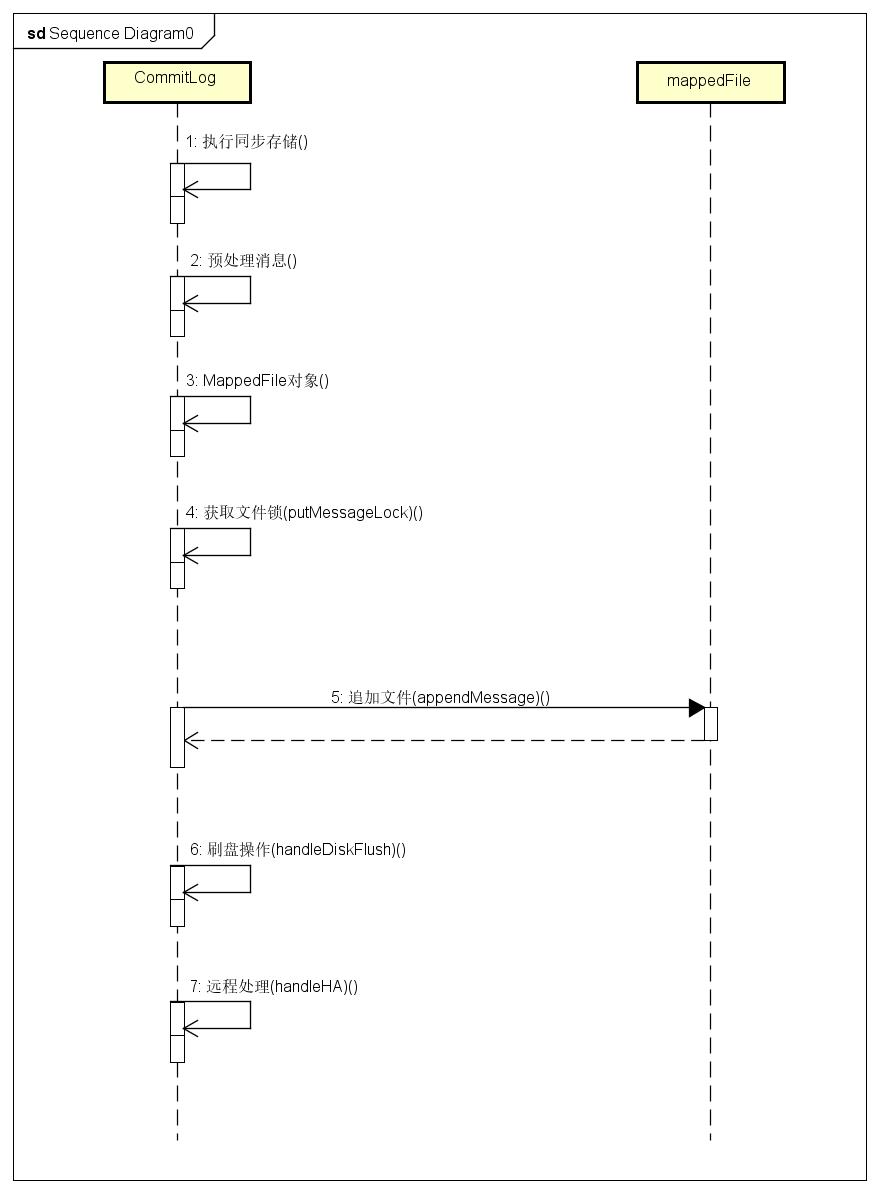
写入commitLog文件的过程分为以下几个步骤:
- 对消息进行处理(消息预处理、延时消息处理)
包括消息的预处理(set一些属性值)、处理延时消息(隐藏真实topic放入延时队列的topic中) - 获取到当前正在激活的文件
这一步指的是,获取到当前正在使用的文件并转化成为MappedFile文件 - 获取到文件锁
获取到文件锁,保证文件在写入时是独占的
protected final PutMessageLock putMessageLock;


putMessageLock.lock();- 将消息追加到文件MappedFile中
- 执行刷盘操作
- 执行同步操作
- 时序图
appendMessage() - 追加文件的方法
mq追击commitLog是用**MappedFile.appendMessagesInner()**方法来实现的,主要有以下几个部分组成
- 获取到当前写入的偏移量
- 创建内存共享区(slice())
- bulidMessage(构建msg对象)
- 特殊处理事务性消息
- 序列化消息
- 获取当前消息的偏移量
- 将数据写入ByteBuffer中,完成写入操作
刷盘操作() - handleDiskFlush
public void handleDiskFlush(AppendMessageResult result, PutMessageResult putMessageResult, MessageExt messageExt) {
        // 同步刷新
        if (FlushDiskType.SYNC_FLUSH == this.defaultMessageStore.getMessageStoreConfig().getFlushDiskType()) {
            final GroupCommitService service = (GroupCommitService) this.flushCommitLogService;
            //等待刷新失败
            if (messageExt.isWaitStoreMsgOK()) {
              //省略代码
            } else {
                //执行刷新方法
                service.wakeup();
            }
        }
        // 异步刷新
        else {
            //执行事务消息的刷新
            if (!this.defaultMessageStore.getMessageStoreConfig().isTransientStorePoolEnable()) {
                flushCommitLogService.wakeup();
            } else {
                //执行异步消息的刷新
                commitLogService.wakeup();
            }
        }
}- 时序图
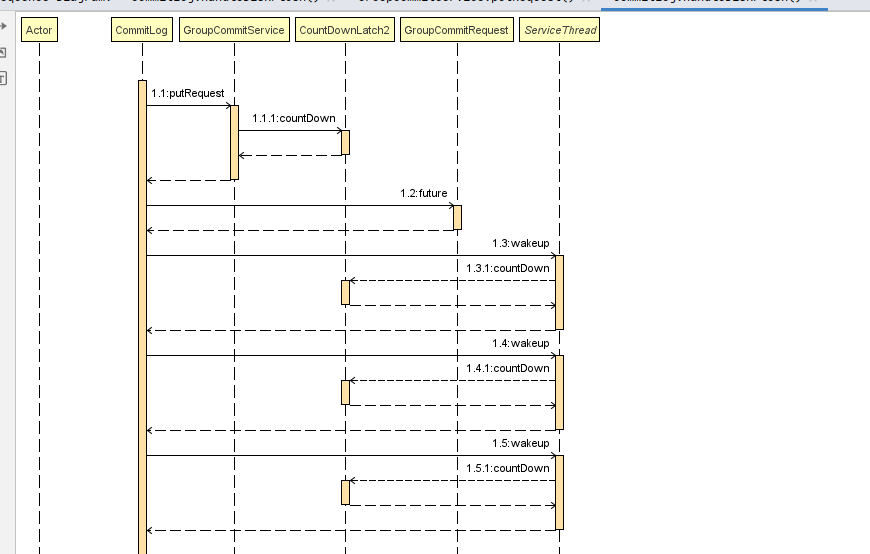
从图中可以看出
- 同步刷盘的策略
在1.1 putRequest方法中调用刷盘方法,然后等待1.2 future方法返回结果
- putRequest
public synchronized void putRequest(final GroupCommitRequest request) {
    synchronized (this.requestsWrite) {
        this.requestsWrite.add(request);
    }
    if (hasNotified.compareAndSet(false, true)) {
        waitPoint.countDown(); // notify
    }
}putRequest将GroupCommitRequestadd进*GroupCommitService.list的集合中
private void doCommit() {
    //采用读list和写list分离的策略
    synchronized (this.requestsRead) {
        if (!this.requestsRead.isEmpty()) {
            for (GroupCommitRequest req : this.requestsRead) {
                // 下一个文件中也可能有一条消息,因此要多刷新两次
                boolean flushOK = false;
                for (int i = 0; i < 2 && !flushOK; i++) {
                    flushOK = CommitLog.this.mappedFileQueue.getFlushedWhere() >= req.getNextOffset();
                    if (!flushOK) {
                        CommitLog.this.mappedFileQueue.flush(0);
                    }
                }
                req.wakeupCustomer(flushOK);
            }
        }
    }
}


//flush

public boolean flush(final int flushLeastPages) {
    boolean result = true;
    MappedFile mappedFile = this.findMappedFileByOffset(this.flushedWhere, this.flushedWhere == 0);
    if (mappedFile != null) {
        long tmpTimeStamp = mappedFile.getStoreTimestamp();
        int offset = mappedFile.flush(flushLeastPages);
        long where = mappedFile.getFileFromOffset() + offset;
        result = where == this.flushedWhere;
        this.flushedWhere = where;
        if (0 == flushLeastPages) {
            this.storeTimestamp = tmpTimeStamp;
        }
    }
    return result;
}

//mappedByteBuffer.force

public int flush(final int flushLeastPages) {
    if (this.isAbleToFlush(flushLeastPages)) {
        if (this.hold()) {
            int value = getReadPosition();
            try {
                //We only append data to fileChannel or mappedByteBuffer, never both.
                if (writeBuffer != null || this.fileChannel.position() != 0) {
                    this.fileChannel.force(false);
                } else {
                    this.mappedByteBuffer.force();
                }
            } catch (Throwable e) {
                log.error("Error occurred when force data to disk.", e);
            }

            this.flushedPosition.set(value);
            this.release();
        } else {
            log.warn("in flush, hold failed, flush offset = " + this.flushedPosition.get());
            this.flushedPosition.set(getReadPosition());
        }
    }
    return this.getFlushedPosition();
    }
可以看到同步刷盘的步骤是
i. GroupCommitService.doCommit()
ii. mappedFile.flush()
iii. mappedByteBuffer.force()
同步刷盘的简单描述就是,消息生产者在消息服务端将消息内容追加到内存映射文件中(内存)后,需要同步将内存的内容立刻刷写到磁盘。通过调用内存映射文件(MappedByteBuffer的force方法)可将内存中的数据写入磁盘。
- 异步有缓冲区刷盘的策略是执行1.4 flushCommitLogService.wakeup没有临时缓冲区
- 异步无缓冲区刷盘的策略是执行1.5 commitLogService.wakeup有临时缓冲区
分析一下异步刷盘的方法有两种:
一种是启用transientStorePoolEnable这种会先将数据写到堆外内存上,在由堆外内存写到PageCache,然后在有PageCache刷盘到磁盘上。
一种是消息直接追加到与物理文件直接映射的内存中,然后刷写到磁盘中
刷盘的总结
-
同步刷盘依次是GroupCommitService.doCommit -> mappedFile.flush() ->mappedByteBuffer.force()
-
异步刷盘又分为
2.1 有缓冲区:消息先进入文件缓冲区,在文件缓冲区等待2s后在进入内存映射区 ->最后内存映射刷入磁盘
2.2 无缓冲区:消息直接进入内存映射区 -> 最后刷入磁盘文件中
rocketmq的内存映射
MappedFile文件是rockedmq内存映射文件的具体表现,先看一下如何查找
查找MappedFile的方法
- 通过时间戳来进行查找
public MappedFile getMappedFileByTime(final long timestamp) {
        //获取到全部MappedFile文件
        Object[] mfs = this.copyMappedFiles(0);

        if (null == mfs)
            return null;

        for (int i = 0; i < mfs.length; i++) {
            MappedFile mappedFile = (MappedFile) mfs[i];
            //根据传入的时间戳,查询第一个更新时间大于传入时间戳的文件
            if (mappedFile.getLastModifiedTimestamp() >= timestamp) {
                return mappedFile;
            }
        }

        return (MappedFile) mfs[mfs.length - 1];
}- 根据偏移量来查询
int index = (int) ((offset / this.mappedFileSize) - (firstMappedFile.getFileFromOffset() / this.mappedFileSize));
    MappedFile targetFile = null;
    try {
        targetFile = this.mappedFiles.get(index);
    } catch (Exception ignored) {
    }
    //判断根据offset计算出来的index是否有对应的文件
    //因为MappedFile文件可能被修改,因此要再次检查一遍文件的offset是否符合
    if (targetFile != null && offset >= targetFile.getFileFromOffset()
        && offset < targetFile.getFileFromOffset() + this.mappedFileSize) {
        return targetFile;
    }

    //如果不符合就需要遍历循环一次
    for (MappedFile tmpMappedFile : this.mappedFiles) {
        if (offset >= tmpMappedFile.getFileFromOffset()
            && offset < tmpMappedFile.getFileFromOffset() + this.mappedFileSize) {
            return tmpMappedFile;
        }
    }
MappFile文件的作用
提交数据的方法主要有commit、commit0,commit()主要是调用commit0()
- commit0
protected void commit0(final int commitLeastPages) {
    int writePos = this.wrotePosition.get();
    int lastCommittedPosition = this.committedPosition.get();

    if (writePos - this.committedPosition.get() > 0) {
        try {
            ByteBuffer byteBuffer = writeBuffer.slice();
            byteBuffer.position(lastCommittedPosition);
            byteBuffer.limit(writePos);
            //关键代码
            this.fileChannel.position(lastCommittedPosition);
            this.fileChannel.write(byteBuffer);
            this.committedPosition.set(writePos);
        } catch (Throwable e) {
            log.error("Error occurred when commit data to FileChannel.", e);
        }
    }
}
commit0
- 首先创建writeBuffer的共享缓存区,然后将新创建的position回退到上一次提交的位置(committedPosition),设置limit为wrotePosition(当前最大有效数据指针)
- 把commitedPosition到wrotePosition的数据复制(写入)到File Channel中,然后更新committedPosition指针为wrotePosition。
commit的作用就是将Mapped File#-writeBuffer中的数据提交到文件通道FileChannel中。
ByteBuffer使用技巧:slice()方法创建一个共享缓存区,与原先的ByteBuffer共享内存但维护一套独立的指针(position、mark、limit)

